
Creating clear, professional biomedical illustrations used to mean either hiring a scientific illustrator or spending hours in a vector editor. Enter BioGDP (the Generic Diagramming Platform) — a free, web-based platform that provides thousands of pre-drawn biomedical icons, editable templates, and an online editor that lets researchers produce publication-quality schematics fast.
BioGDP combines a large, curated library of bio-graphics with a drag-and-drop editor and a set of templates tailored to common use-cases (mechanisms, experimental workflows, cell & organelles, molecules, model organisms, etc.). The resource was formally described in a scientific paper as the “Generic Diagramming Platform (GDP)” and highlights the platform’s scale and intention: a comprehensive, reusable library of high-quality biomedical graphics to speed figure creation.
Why researchers like BioGDP
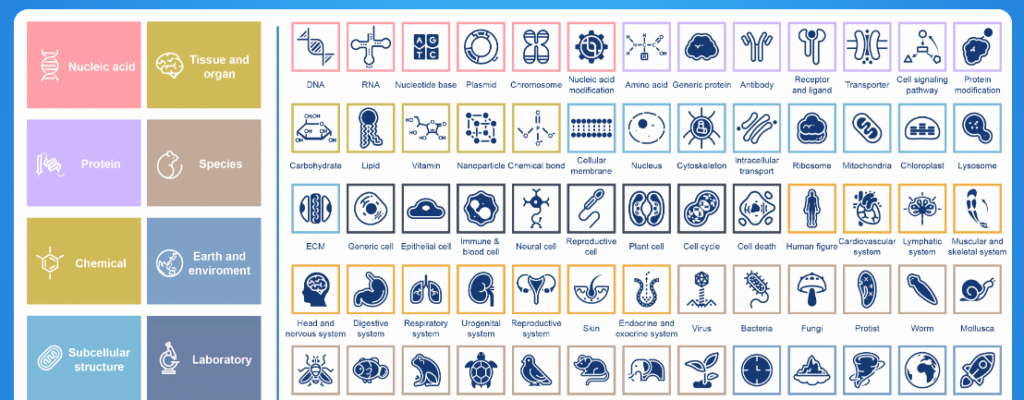
- Huge, curated icon library: The platform’s creators report thousands of professionally designed bio-graphics (the paper documents the resource as containing several thousand images and hundreds of templates). These elements are categorized so you can quickly find what you need for cells, organelles, proteins, pathways and more.
- Template + editor combo: Instead of building everything from scratch, you can start from a scientific template (e.g., figure templates from classic textbooks) and adapt it—move parts, recolor, add labels—so figures are consistent and publication-ready.
- Free and web-based: BioGDP is accessible through the browser and provides many resources without charge, which helps labs and students who don’t want or can’t afford paid illustration subscriptions.
One important limitation to know
Some users and reviewers have pointed out that while BioGDP offers PDF export, it currently lacks a robust option to export editable vector files (e.g., standalone SVGs that remain fully editable outside the platform). That can lock your illustrations into the platform if you later need vector source files for advanced edits or for very high-resolution printing. If vector export is critical for your workflow, be aware of this limitation and test the export quality for your needs.
Step-by-step: how to use BioGDP (explaining it as if you’re showing someone)
Below I’ll walk you through accessing the site, finding assets, building a figure, and exporting it — in a friendly, “I’ll show you” style.
- Open the website
- Go to:
https://biogdp.com/in your browser. The landing page introduces the platform, categories and editor (no download required).
- Go to:
- Browse the library
- Look for a sidebar or a top menu that lists categories (cells, organs, molecules, experimental tools, organisms, etc.). Click a category to see subcategories and icons.
- Tip: use search terms like “mitochondria”, “antibody”, “microscope” to quickly filter icons.
- Pick a template (recommended for fast results)
- Templates are pre-made layouts (mechanism diagrams, workflows, typical publication panels). Select a template that resembles the figure you want—this saves time and ensures consistent styling. The platform includes template collections derived from textbooks and literature.
- Open the editor and drag-and-drop
- Drag icons from the library into the canvas. You can reposition, resize, rotate, group elements, and add text labels.
- Use alignment tools and snap-to-grid if available to keep everything tidy.
- Customize styles and labels
- Edit text (font size, alignment), add arrows and connectors for pathways, and annotate panels with figure labels (A, B, C).
- Recolor objects where appropriate (e.g., use color to highlight treatment vs control).
- Save and organize
- Save your project in the platform (if you want to keep editable source files on the site).
- Check if the platform offers an account — some tools let you save libraries, revisions, or share with collaborators.
- Export
- Export to PDF for publication usage or raster images if needed. Note the caveat: vector export (downloadable, fully editable SVG or separate vector layers) may be limited — test the exported file to ensure the resolution and editability meet your needs.
- Contribute (optional)
- The creators encourage community submissions—if you’ve made a polished icon, you may be able to contribute to the library (check the site’s submission or contact pages).
Quick tips to get better figures, faster
- Start from a template similar to your final layout.
- Keep components grouped (easier to move). Use consistent font sizes and arrow styles.
- Use layers or order controls: place labels above icons for clarity.
- For journal figures, export at the recommended DPI (300–600 dpi) and double-check axis labels and font legibility.
- If you must have a fully editable SVG, either test BioGDP’s exports first or recreate the final exported PDF in Inkscape/Illustrator from the exported file.